I recently presented Test Driven Development in iOS to a local Cocoa user group, where I TDD-ed the authentication of a Twitter app in about 1.5 hours of live coding. It was a great way of showcasing TDD, and the listeners seemed to enjoy it as well.
In this post I'll expand on what I said there, by showcasing specific useful tips and tricks for unit testing in iOS. While the talk was more of a plain TDD talk than an iOS talk, this post has iOS specific content that other iOS developers will find useful when unit testing their apps.
If you want to get started with unit tests on iOS, I plan to write about that later. This post is for those who already know how to write and run them.
Avoid the application delegate and view controllers
I suggest you try to avoid the application delegate entirely in your unit tests. Don't even add it to the unit test target. The unit test runtime environment is very different from the simulator and device environment, so your application delegate will most likely fail to do anything at all.
This might be obvious to you, but abstracting all the code you want to unit tests into separate NSObject ancestor classes will make your life a lot easier. With separate classes, you are able to write contracts utilizing strings, arrays and other easy to create objects, rather than NSBundles, UIApplications and other hard to create objects.
For example, if you're fetching data from a server, put it in a separate ServerFetcher class that inherits from NSObject, instead of injecting the code directly into a view controller. It's much easier to make an instance of a simple NSObject class in your tests and call methods on it, than trying to instantiate a UIApplication to call your app delegate and view controllers and what not.
Core Data entities
Update: I published an updated version of this code.
When unit testing Core Data entities, we want to to start with a clean slate for each test. The example below showcases the use of an in-memory datastore instead of the default SQLite datastore. With an in-memory datastore, all we need to do in order to get a full fletched Core Data stack, is to initialize Core Data in setUp. No extra cleanup or resets is required. In the example below, we do a cleanup in tearDown:, but that's only for memory management. We get a clean slate from setUp regardless.
In actual projects I prefer to wrap all the Core Data stuff for my tests in a ManagedObjectTestHelper class that has a context method, but for clarity I've written the code directly into the unit test here.
When you're set up, you can use your normal Core Data methods as in your application code. There's an example of this in the testSomething test case.
@interface MyTest : SenTestCase {
    NSManagedObjectModel *model;
    NSPersistentStoreCoordinator *coordinator;
    NSPersistentStore *store;
    NSManagedObjectContext *context;
}
@end

@implementation MyTest
- (void)setUp {
    model = [[NSManagedObjectModel mergedModelFromBundles:[NSBundle allBundles]] retain];
    coordinator = [[NSPersistentStoreCoordinator alloc] initWithManagedObjectModel:model];
    store = [[coordinator addPersistentStoreWithType: NSInMemoryStoreType
                                       configuration: nil
                                                 URL: nil
                                             options: nil
                                               error: NULL] retain];
    context = [[NSManagedObjectContext alloc] init];
    context.persistentStoreCoordinator = coordinator;
}

- (void)tearDown {
    [context release];
    [store release];
    [coordinator release];
    [model release];
}

- (void)testSomething {
    MyEntity *e = [NSEntityDescription insertNewObjectForEntityForName:@"MyEntity"
                                                inManagedObjectContext:context];
}
@end
Fixtures
Fixtures are (included but not limited to) files in the file system that stores data you can use in your unit tests.
Fixtures can be useful in a number if situations. A good example is XML parsing, where you want to feed your parser with many different XML documents that are tailor made to hit all the edge cases of your parser. Storing the XML documents in files is much more convenient than storing them in string literals in your unit tests. It's a lot easier to get it right when you edit a syntax highlited XML file, compared to editing a large one-liner string literal.
The hard part is bundles. Normally, [[NSBundle mainBundle] pathForResource:@"test1" ofType:@"xml"] will return a NSString containing the path to that file. This is not the case for unit tests, though, where the mainBundle is different from in the application environment. But it's still possible to load files in unit tests.
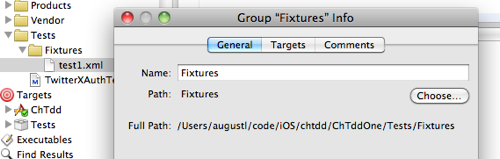
In my Xcode project, I have a Tests group, that is mapped to a Tests directory, so the tests are in a separate directory in the file system instead of the root directory of the project. (Remember, groups in Xcode doesn't necessarily translate to folders in the file system.) Similarly, in the Tests group, I have a Fixtures group, set up to match a folder just like the Tests group. To map a group to a folder in Xcode, select the group, press Command + I, and set the path.
With this exact setup, the following code is copy-pasteable.
-(NSData *)loadFixture:(NSString *)name {
    NSMutableString *path = [[NSMutableString alloc] init];
    [path appendString:[[NSFileManager defaultManager] currentDirectoryPath]];
    [path appendString:@"/Tests/Fixtures/"];
    [path appendString:name];
    NSData *data = [NSData dataWithContentsOfFile:path];
    [path release];

    return data;

}
Update: Jim Leask e-mailed me with an improved version that works with the Xcode 4 style in-application unit testing. Reproduced below by his permission.
-(NSData *)loadFixture:(NSString *)name
{
    NSBundle *unitTestBundle = [NSBundle bundleForClass:[self class]];
    NSString *pathForFile    = [unitTestBundle pathForResource:name ofType:nil];
    NSData   *data           = [[NSData alloc] initWithContentsOfFile:pathForFile];
    return data;
}
Add this method directoy to your unit test, or wrap it elsewhere as you see fit.
If your setup differs from mine, just alter the path string to match your setup.
Here's a live example of this setup. It's an open source Base64 lib I wrote. It's using the exact same setup as outlined above.
If you want a NSString instead of a NSData, you can replace [NSData dataWithContentsOfFile:] with [NSString stringWithContentsOfFile:encoding:error:].
Don't panicPanic
I've had tons of problems with unit testing in Xcode. It can some times be very hard to even set up a working test target that is able to run the tests without yielding all sorts of arcane warnings and errors. I plan to write more about this in the future, but for now, feel free to e-mail me (the address is on the home page) if you struggle with setting up unit tests in Xcode.